Intro
I’ve always wanted to try some #GameDev, but never really picked it up… up until now! 😎
Recently, a buddy of mine started experimenting with Unity game engine tech & had this idea for a game (don’t worry though - it’s not an MMO RPG! 😅). Since it’s not released yet, I’ll remain relatively high-level in the post 🤫 Sorry for being cryptic 🤷♂️
I volunteered to chip in and write some APIs to enhance developers’ productivity, learning some C# & Unity stuff along the way.
For our first Unity rodeo, for better or worse, we’ve agreed we’ll not use any paid plugins/libraries - if anything, we’ll create our own.
So, we’ve rolled up our sleeves and started defining what it takes to deliver a single-player, offline, 3D, dynamic, strategy & management-style game with story elements & decent re-playability.
It would (at least to some extent) be cross-platform & allow local game saves (well, duh).
If only I knew beforehand that I was signing up for a 6-week crash-course in a jungle of MonoBehaviours, ScriptableObjects, IEnumerables, delegates… and much more! 😱

⚠️ Spoiler Alert ⚠️ - I’d do it again!
(My) Main Pillars
I won’t go into all the crazy specifics that we had to iron out but rather touch base on foundational concepts that helped streamline our process. These are the main backend areas I helped to get up & running:
- 💾 Persistence (Save) System
- 📝 Questing System
- 🏗️ Build & deployment automation on CI (Github Actions + Itch.io)
- Other (beyond the scope of this blog post)
- 📙 Item DB, 🎒 Inventory & 🥇 Rewards APIs
- 🔊 Audio: mixers & their volume controls, song fading, SFX
We ensured these subsystems knew little or nothing about each other to keep things loosely coupled. Yet, we made them inter-operable with a simple mechanism to publish or subscribe to arbitrary game events.
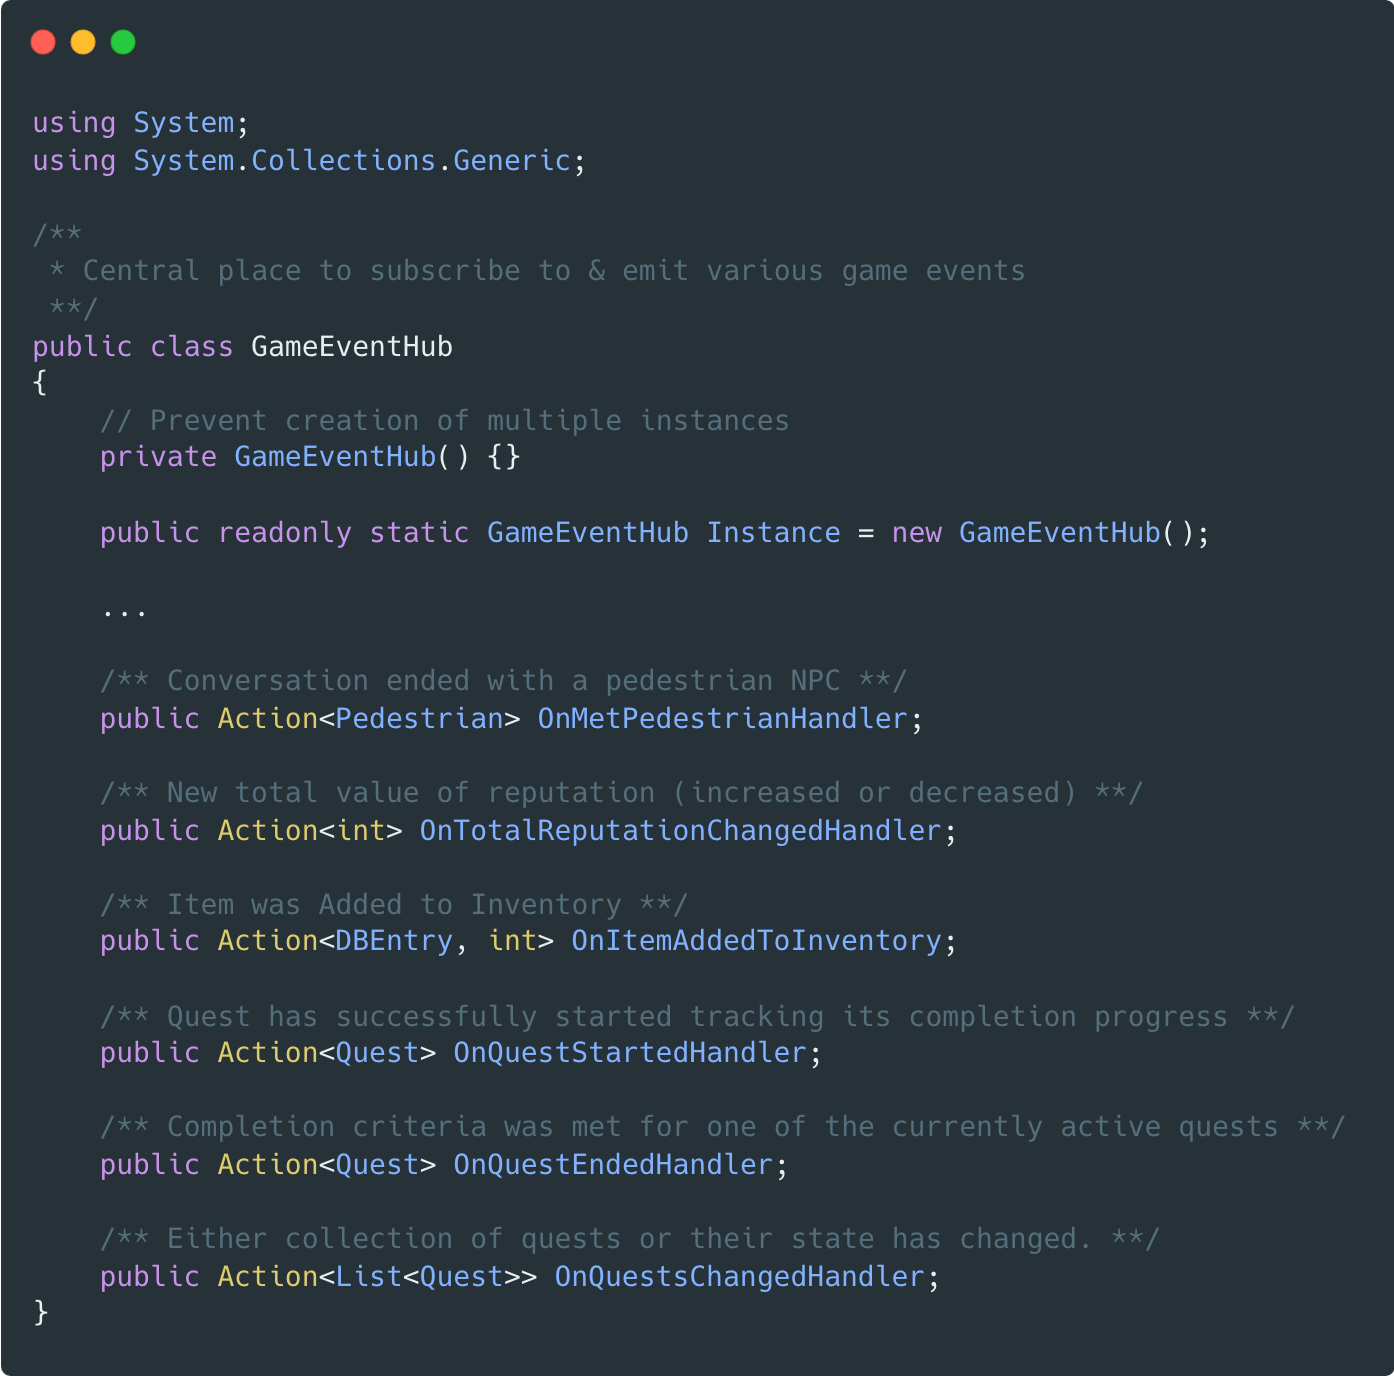
The Game Event Hub
To simplify the communication across our separate subsystems, we’ve created a GameEventHub, simply a collection of C# delegates.
Using this intuitive delegate mechanism, one could subscribe to game events of interest from practically anywhere.
C# Building Blocks
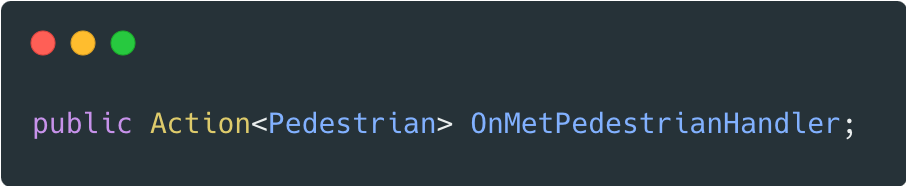
Since we did not need the broadcaster to receive any results from the subscribers, we mostly used a special (simplified) delegate called Action.
In a nutshell, an Action defined as
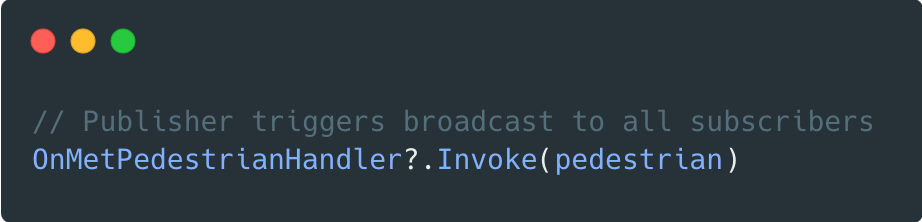
can broadcast the new value to subscribers as:
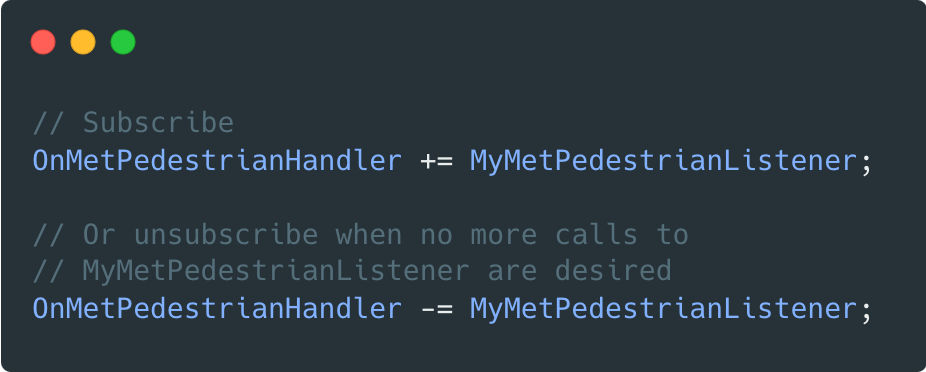
and be subscribed to as:
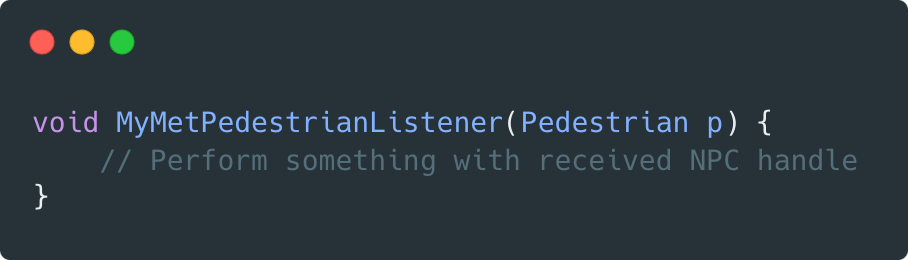
MyMetPedestrianListener in this case has to accept a single argument of type T as defined in Action<T>:
C# multicast delegates are actually nice enough to instantiate it for you as long as you use the appropriate += and -= syntax, so even though we did not explicitly assign an initial value to OnMetPedestrianHandler, the code above won’t complain at runtime.
Our Event Hub
Here’s a couple of events we used (that’s also how elements like Quest UI Overlay knew when the state of quests changed):
Note that the event keyword can enforce broadcast from the publisher class & aid in designing a unidirectional data flow implementation.
However, our approach allows arbitrary classes to trigger any GameEventHub’s broadcasts.
It simplified our workflow & got us moving forward quicker (we triggered the broadcasts from appropriate MonoBehaviours and plain C# game logic classes).
Questing System
Our ultimate goal was to allow someone who knows little about Unity or programming to be able to create quests & link them to a specific point of the game story easily.
We’ve managed to set it up so that all quests are created with just a couple of mouse clicks & can be selected as NPC conversation outcomes without any code.
The Usage
By the time I picked up questing, the project would already have the foundations for tree-based NPC conversations.
Basically, it meant that interactions with NPCs will have different outcomes depending on what player responds to them (from the provided options).
I used this existing setup to extend the possible conversation outcomes with starting a new quest.
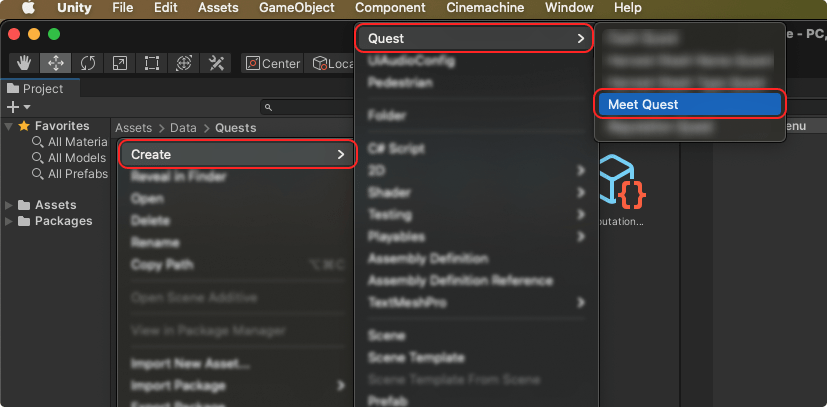
Our created quest templates can appear in Unity’s UI.
For instance, one could create a new quest called “Meet 2 People Quest” by selecting RMB->Create->Quest->Meet Quest:
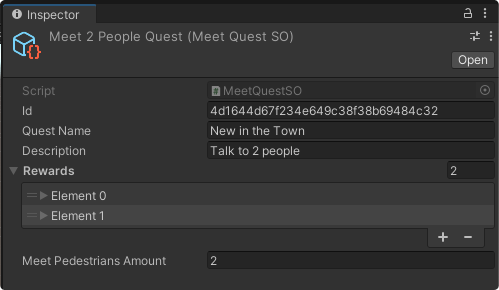
Then they’d fill in the details required by this quest type, set the goal and optionally - rewards:
And voilà! You can now drag & drop this quest as an outcome to one of our NPC conversation tree leaves:
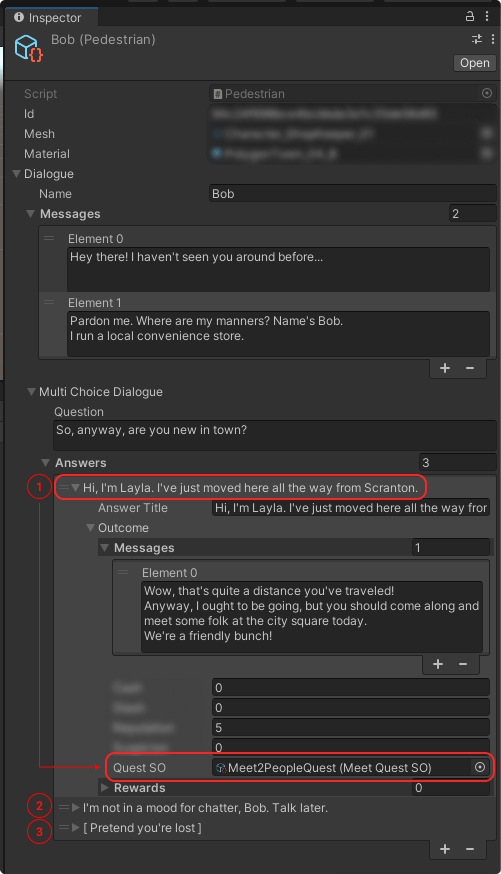
Now the quest will be started when the player chooses option 1 during the first conversation with that NPC (of course, there’s some code behind the scenes which handles the starting, but you get the idea).
The Implementation
So now you may be thinking that although it’s easy to create new quests from the predefined templates, how could the templates themselves be implemented?
We piggy-backed on Unity’s ScriptableObject (abbreviated as “SO”) to just be a dumb holder for quest requirement data since that’s easily adjustable using Unity’s UI (shallow learning curve).
So our new template would extend QuestSO (ScriptableObject) like so:

This new template can create the quest requirements, but it still needs implementation logic.
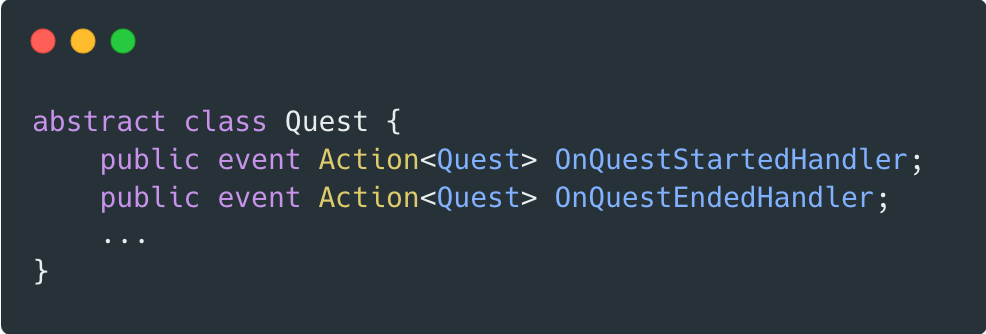
We’ve established a simple Quest abstract class that contains some common properties and exposes the following Actions for subscribers to react when a quest starts or completes:
A MeetQuest template implementation without boilerplate gets as simple as this:
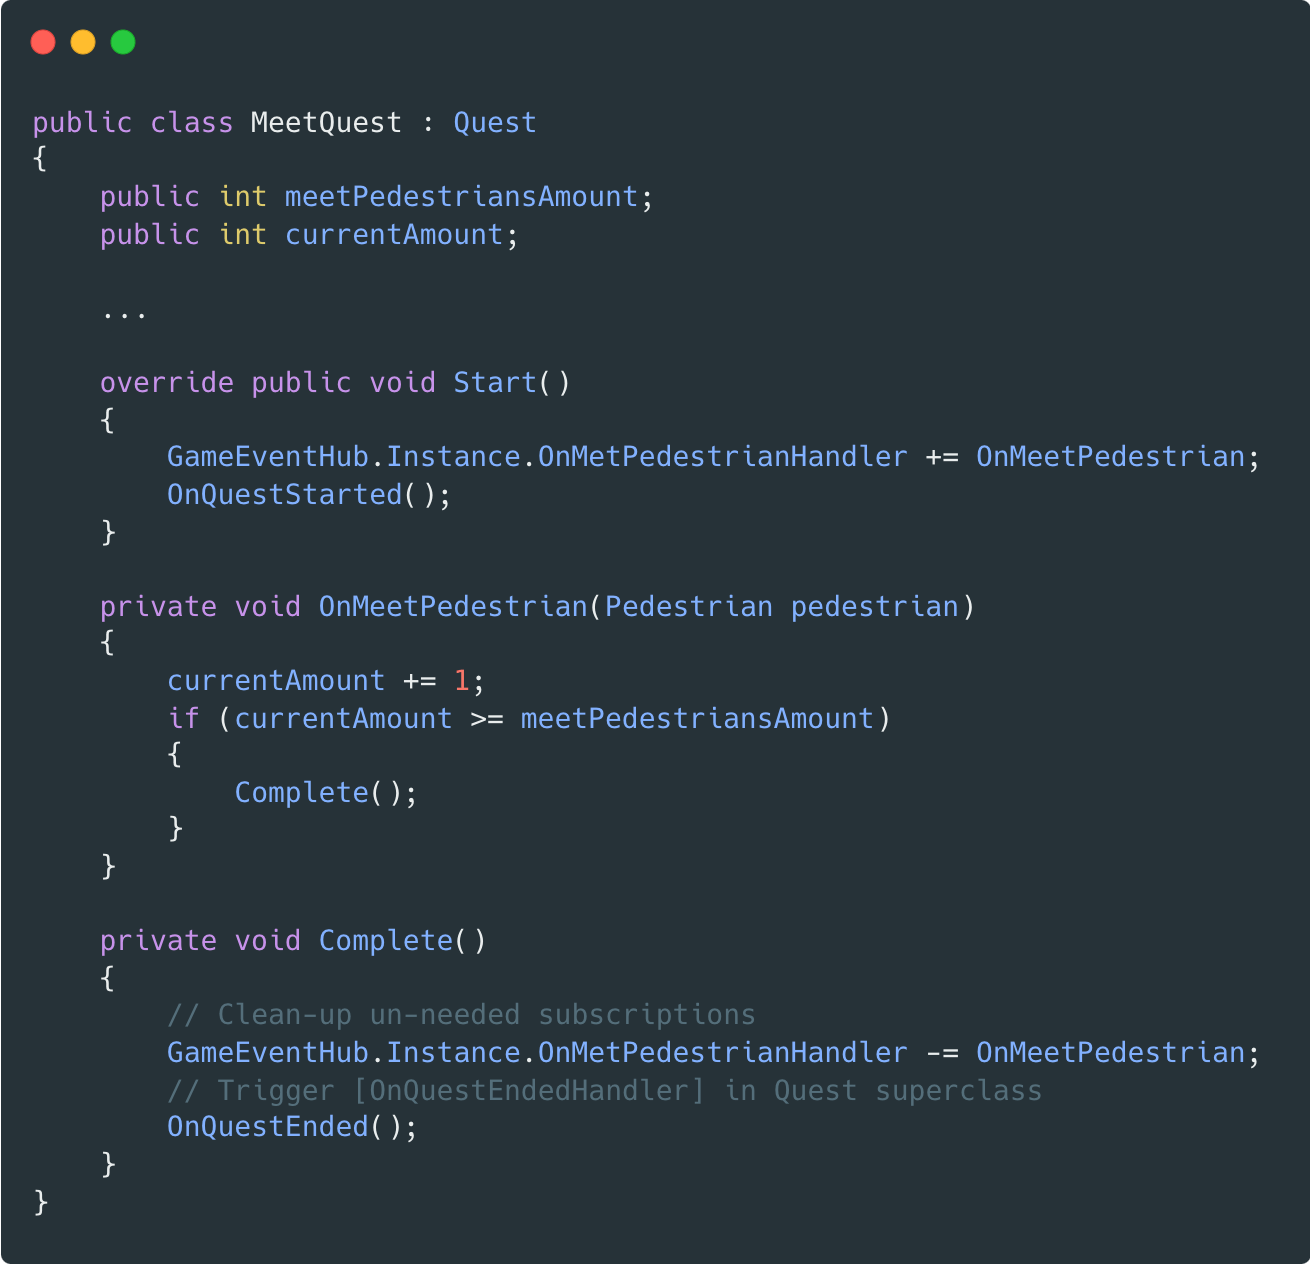
As defined above, the MeetQuest instance keeps track of its progress by subscribing to specific GameEventHub events and broadcasts its completion to anyone listening.
Since arbitrary properties can be made serializable, it will eventually be handled by our IPersistable QuestManager, capturing the quest state as part of the save/load game (persistence) scenarios.
Fully-featured implementation will get a bit more elaborate given the need for persistence support (such as serialization handling, etc.).
Persistence - The Save System
System Goals:
- Save/Load game state
- Persist/Restore chosen Unity objects (e.g.
MonoBehaviours) - Persist/Restore selected non-Unity instances (e.g. custom C# singletons)
- Persist/Restore chosen Unity objects (e.g.
- Delete game save
We’ve decided to try using a free plugin package called Quicksave to perform serialization, saving and loading I/O. However, it presented us with challenges multiple times. We ended up tweaking quite a lot of its internals to make it work for us, rather than constantly fighting its APIs or creating wrappers for our use cases.
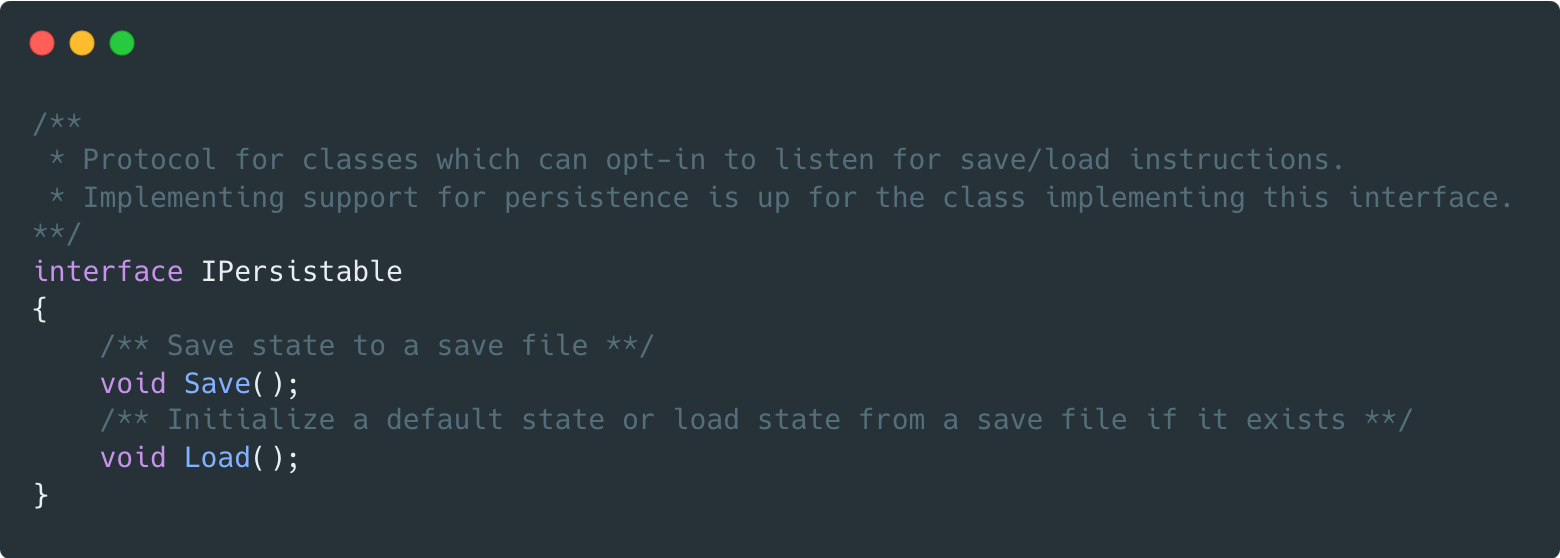
Regardless of the Quicksave package, we’ve defined a simple interface for persistence to be used by our desired classes:
And then created a SaveManager class, which is hooked up to the game UI elements, so that the user could start a new game or continue playing the one in progress:

We used a single save file.
If multiple saves are desired, the IPersistable could be tweaked to receive the specific persistence object to save to and load the state from.
A fully-fledged saving & loading can be implemented by grabbing all Unity’s MonoBehaviours from the scene & picking non-Unity C# classes manually.
With additional tweaks to the JSON serialization library we were using, we enabled support to even save & properly restore classes that are using generics. So, we ended up encoding class type into the save file, which wasn’t too problematic. Still, it is definitely worth being aware of so that devs don’t break game saves by refactoring class names.
Our game state resembled a similar JSON structure during development, which allowed us to tweak it manually to represent an arbitrary game story state, saving our testing time:

Build & Deployment automation - GitHub Actions + Itch.io
If you’re serious about your project, start building for multiple targets, and start doing that early.
However, don’t be that person who keeps sending executables over Google Drive every couple of hours. Proper automation & deployment on the market will save you a lot of time:
- Building for multiple targets will surface potential cross-platform issues early in the process and allow you to effortlessly extend your tester base to whichever platform they’re using.
- Using proper deployment tools may allow you to use incremental updates. Instead of downloading the whole game again, you’ll be shocked to see sometimes the build deltas are just a few KB or MB, and applying a new release patch will take only a couple of seconds for your users.
Butler deployments to Itch.io
Itch.io game store has a straightforward setup process, and although it’s not as fully-fledged as Steam & other app stores, it can save you loads of time at the beginning (and it’s free!). You’ll want to ditch any web upload-based deployment approaches and use Butler utility to push your builds. It’s faster, more reliable & will allow you to surpass the 1GB (or whatever it’s currently) web client upload size limit.
GitHub Actions
I’ve stumbled upon a convenient GitHub Action by game-ci called Unity Builder.
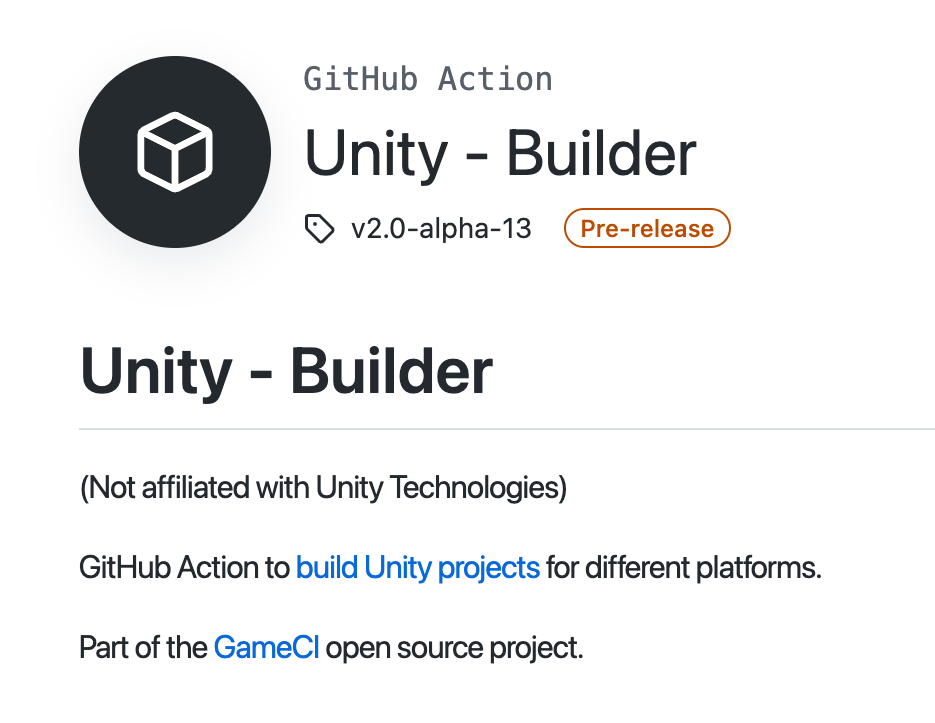
It allowed us to easily automate the Unity builds on Windows, macOS & Linux really fast.
And, you can either store your artefacts on GitHub itself for a later download, or (surprise, surprise) even publish to (a private) Itch.io listing using josephbmanley/butler-publish-itchio-action@master action.
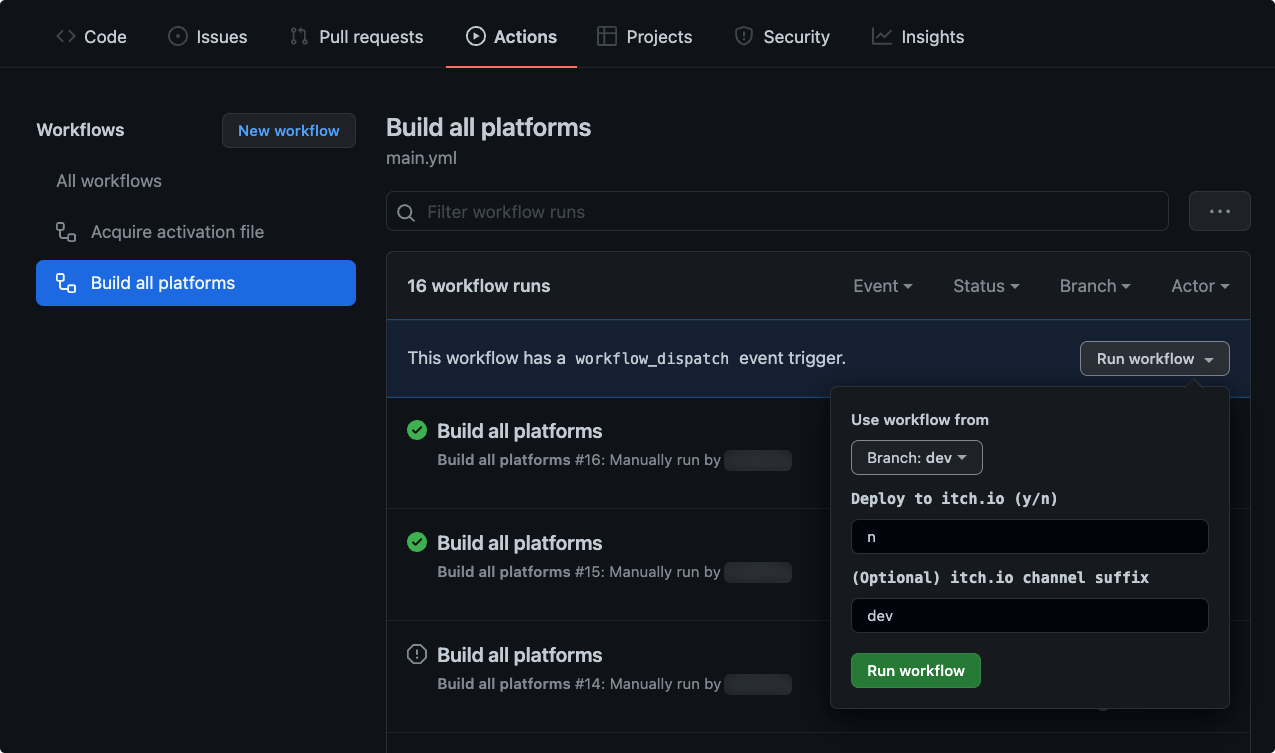
💡 We’ve set up a manual (called workflow_dispatch) trigger for building & publishing to avoid an overwhelming number of deployments (& be in control of our GitHub Actions billable time).
You could then build a branch of your choice & deploy it to a separate Itch.io channel: 👇
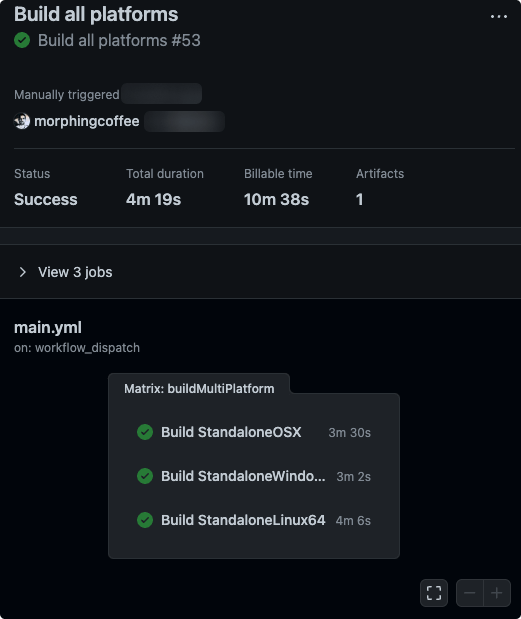
Then, track the build progress live or cancel it:
Or delve even deeper into your build workflow steps to identify where an issue may lie:
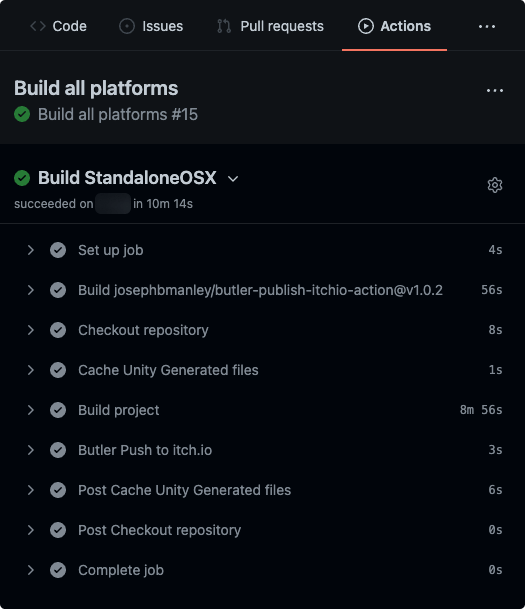
Finally, on successful deployment to itch.io, the update will be available to your consumers within seconds 🚀 :

GitHub YAML gist is available here.
Lessons Learned
We’ve covered some simple mechanisms for Persistence, Event Delegation, Questing & Deployment Automation that worked for us.
The code blocks above contain snippets to get the fundamental ideas across, rather than a fully-fledged codebase to invade your project straightaway.
💡 Often, the silver bullet doesn’t exist – the goal is to spend time to identify what could improve your unique situation given the requirements & assumptions you’re working with;
and adapt the relevant, beneficial practices to your individual needs.
The Takeaways
💡 The pain points will differ between projects & teams. Make sure you spend time identifying yours.
💡 The automation setup contributed significantly to ease our development workflow as we were always one GitHub-Actions-click-away from deploying any of your latest commits for the audience, even from feature branches.
💡 Free, top-quality, open-source software packages are not the easiest to find in Unity’s ecosystem. So investing in well-maintained plugin packages for the core game functions like persistence or conversation graph builders can get you much closer to your aspirations.
💡 As in most of the projects, one should always anticipate things to constantly evolve and existing solutions to become incompatible as requirements change;
Don’t let those setbacks stop you from moving forward - be prepared to embrace that change & you’ll come up with innovative solutions that work for you.
💡 And have fun. Always have fun.
If you’re working on design, UX, Prefabs, Audio, VFX, architecture, networking, just name it… Make sure you’re not missing out on the fun stuff of the collaborative creation & brainstorming process.
It’s a Wrap
And so as the post is titled - my contributions spanned over 6 weeks within the first and the last commit. It’s been a blast. Not only that, I’ve learned plenty in this C# & Unity universe - would definitely do it again!
Follow me on @morphingcoffee to stay in touch
and remember - keep moving forward 🚂

Attributions
Unsplash Photos by David Kovalenko & Bryan Walker